Tuesday, June 30, 2015
June 30
Buildings & Grounds personnel will be fertilizing the fields near the blockhouse today. Dust may interfere with the painting of exterior walls so we will work on the inside.
Monday, June 29, 2015
Thursday, June 25, 2015
June 25
- Garage door wall is completely painted.
- We will apply hydraulic cement on holes in the exterior walls and finish painting the entrance wall.
 |
| Priming the back wall. |
 |
| Garage door area painted. |


Wednesday, June 24, 2015
June 24
Goals
- Finish priming the exterior walls of the blockhouse.
- Start painting the exterior walls.

Tuesday, June 23, 2015
Monday, June 22, 2015
June 22
We'll be priming all day.
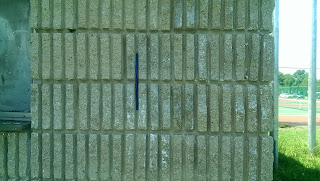


The prime we use on the walls are transparent; therefore, when it dries, the appears completely clear. We have to take pictures to keep track of what has already been primed (and proof that we worked at all). We used painter's tape to mark where we left off.


We purchased samples of the colors we are going to use for the blockhouse and tested it on a primed section of the wall.
 |
| Bernard advertising Pepsi. |
Thursday, June 18, 2015
June 18
Activities
- Apply Primer on the front exterior wall.
- We were going to apply primer to the interior walls, but we purchased the wrong roller.
- We need to fill holes on the front wall with hydraulic cement before priming.
 |
| The crew at work. |
Tuesday, June 16, 2015
June 17
Hunting Down Materials.
The North Jersey office of Quikrete was contact in reference to their waterproofer for details on their product.

Heavy Duty Masonry Coating: This product can be:
Activities

The North Jersey office of Quikrete was contact in reference to their waterproofer for details on their product.
Heavy Duty Masonry Coating: This product can be:
- Tinted
- Painted over
- Thin down to be put on with a roller
- It is a concrete base sealer and will seal the walls from water.
- It has to be special order it either from Lowes or from Progressive Brick (Hasbrought Height. Route 17)
- The product number is 130140.
Activities
- Today we will cover the base of the interior walls with hydraulic cement to keep rainwater from flooding into the blockhouse.
- Transport unwanted objects to SA119.
- Apply primer to the exterior walls as preparation for painting.
- Select adequate paint for the blockhouse.
 |
| Russell Cardenas applying Hydraulic Cement on base of interior walls. |

June 16
- We used a grinding tool to remove the rest of the bolts on the walls and floor.
- Reorganized everything in the blockhouse
- We used a Power Washer, lent to us by Hugh Knowlton from Buildings & Grounds to remove debris and moss from the exterior walls of the blockhouse. We discovered that water was leaking into the building from the base of the back wall; therefore, we will be applying hydraulic cement throughout the perimeter of its interior.
 |
| Karcher Power-Washer |
 |
| Marie Manzan using the power-washer |
June 15
- The powerpoint presentation was successful. If you are interested in downloading the document, please email stemblockhouse@gmail.com
- The workbench has been completed.
Goals
- We will be rearranging and organizing the inside of the blockhouse.
- Hugh Knowlton from Buildings & Grounds will lend us a Power Washer. We will wash the exterior walls of the blockhouse for painting tomorrow at 10:00am (6/16/15).
Thursday, June 11, 2015
June 11
Accomplishments:
- Completed the French Drain. (Pictures of progress will be posted soon)
Goal:
- Finish the workbench.
The French Drain
Our first major issue upon entering the blockhouse was not the dust or spiderwebs, but the flood that had formed every time it rained. The rainwater leaked from beneath the garage door and the base of the walls, making it nearly impossible to do productive work within the building. In fact, one of the very first actions taken by our predecessors were to replace the roof because water was leaking from above as shown in the following picture:


In the left, Luis De Abreu slathers primer (the purple liquid) at the joints of the pipes, which prevents any contaminants from interfering with the bonding of the pipes when the Oatey primer cement (the cream container below) is applied to keep them joined.
Holes were drilled onto the last pipe leading into the sewer basin and covered by a filter sock (the black fabric) and then buried under gravel. This is calle
d a french drain. The idea is that rain water will sink through the gravel and enter the pipe while keeping out dirt and debris.

Notice the shaded area on the wall, trailing from the roof and narrowing at the floor.
As a follow up, STEM 2015 has been working on a drain in front of the garage door to channel the rainwater through PVC pipes and into a sewer basin.


Chisel and hammer were used to remove the asphalt and old concrete. A shovel was used to dig out the gravel and dirt until we reached about 8'' below ground-level. After this, we created a new base of concrete to support the drainage and seal it in place.


A drill was rented from McManus Rentals by our supervisors Professor Joe Sivo and Luis De Abreu. It was used to create a hole through the sewer basin so we may feed the end of a PVC pipe through it.
 |
| Luis drilling through basin sewer. |
Hydraulic Cement was used to seal the base of the outside wall by the garage door and the area around the PVC pipe when fed through the sewer to keep it in place. We mixed the hydraulic cement with water at a 3:1 ratio until we obtained a pasty mixture. It's almost like playing with clay, except it hardens in approximately a minute after mixed with water. Our team had to work fast and diligently, making sure we didn't leave indentation or fingerprints on the finished product.
 |
| Luis applying primer to the pipe joints |

In the left, Luis De Abreu slathers primer (the purple liquid) at the joints of the pipes, which prevents any contaminants from interfering with the bonding of the pipes when the Oatey primer cement (the cream container below) is applied to keep them joined.
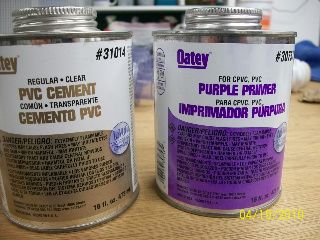 |
| Oatey Cement to the left and Primer to the right. |
Holes were drilled onto the last pipe leading into the sewer basin and covered by a filter sock (the black fabric) and then buried under gravel. This is calle
d a french drain. The idea is that rain water will sink through the gravel and enter the pipe while keeping out dirt and debris.
 |
| Pipe with Filter Sock |
 |
| Pipe with holes |
 |
| Filter Sock |
At last, the french drain is complete and most of the water flooding into the building has been eliminated; however, more hydraulic cement is to be added at the base of the blockhouse interior walls.
 |
| End of pipe leading into sewer basin and sealed with hydraulic cement. |
 |
| Complete French Drain |
Wednesday, June 10, 2015
June 10
Goals
- We are going to dig out all the mud that accumulated in the trench due to rainwater. Then, we will proceed to drill a hole through the basin sewer with the McManus Drill. We will be digging another 7-8in.
- Finish the workbench.
- Organize the blockhouse.
- Finish preparing powerpoint presentation.
Tuesday, June 9, 2015
June 9
- There will be a presentation on June 11, 2015 (Thursday).
- Today the team will focus on preparing the presentation.
- Supervisors Joe Sivo and Luis De Abreu will rent a drill from McManus Rentals in Hackensack to drill a hole through a concrete sewer basin to connect drainage pipe.
- The color scheme for the blockhouse has been accepted. Below are illustrations of how the finished product will look:


June 8
It all started here. STEM Student Union was founded around the idea of the Blockhouse in 2012. The goal of this project is to convert the softball shed behind the Technology Building at the Bergen Community College, Paramus campus to an off-the-grid STEM workshop. Progress has been slow throughout the years, but this Summer '15 a new wave of STEM students are picking up the mantle and adopting the responsibility of continuing our predecessors' legacy.

This project officially reactivated as of May 25, 2015.
Upon entering the blockhouse, it was full of spiderwebs, debris, and trash. The room was flooded by rainwater from the outside.
The following is a rundown of what has been accomplished since that date:
- Clean and organize.
- We needed to create an environment we could work and think with relative comfort; as a result, the water and debris was swept out of the building and the remains vacuumed with a wet/dry vac.
- Spiders were escorted outside of the premises.
- A few bicycles were relocated to lot A.
- We built a workbench and transported a desk with various STEM tools from SA119 to the blockhouse.
- A temporary AC/Heating Unit was measured and installed.
- Remove bolts.
- Previously, the Blockhouse's inside was divided by a wall. The wall had already been removed by the time we arrived, but there were still nails and bolts on the floor and walls which needed to be grinded.
- Digital Models and Representations.
- The dimensions of the building were recorded and inputted on AutoCAD to create a floor plan.
- An illustration of the building's exterior color scheme has been developed on Photoshop for proposals.
- Drainage.
- We have been constructing a drain in front of the garage door. The flooding has ceased.
- Asphalt, concrete and rocks were chiseled out.
- Cement and gravel were used to create a supporting base before installing the drain.
- Hydraulic Cement was applied near the garage door.
- Research.
- Contacted supplier for confirmation on product detail, because the specification sheet was incomplete online. We were directed to the manufacturer.
- We went to Jo-Ann Fabric and Craft and took pictures of various fabrics.
Subscribe to:
Posts (Atom)