Thursday, July 23, 2015

7/22


  • Still continuing to prime the facade.
  • Experimented with the orange paint on the wall and it failed the ascetics test.
  • Tested the orange and purple on the facade and we decided to go with it.
07/23

  • Continue to prime and sand down the facade.
  • Paint the pipes connected to the outside wall to blend in.

Wednesday, July 22, 2015

7/21

  • Continued priming the Facade
  • Attended a robotics workshop
goals for 7/22

  • continue priming

Tuesday, July 21, 2015

07/20


  • Began priming the metal facade.
goals for 07/21

  • Continue priming and sand papering the metal facade.

Monday, July 20, 2015

07/13-16


  • Finished the paint touch ups to the blockhouse
  • Picked up more paint supplies
  • Discovered water seeping through the back wall.
Goals for 07/20

  • Prime the facade

Thursday, July 9, 2015

07/07-09/15


  • Started filling ceiling cracks with big gap and gap filler. After it dried we started shaving the foam that was sticking out to make the top of the walls flush in order to apply hydraulic cement to an even surface.
  • Continued painting all over the inside of the block house
  • Hydraulic cemented some of the holes in the walls and then painted over the dried cement.
  • Took out the metal roll down window and put in a makeshift wooden window replacement.
Goals
continue to the finishing touches of painting.

Thursday, July 2, 2015

July 2


  • The exterior walls have been completely painted.
  • We will finish painting most of the interior today.
Progress on interior:

We taped the base of each wall to avoid paint dripping on the floor.
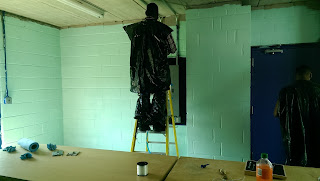
Bernard wearing his battle armor.


We used "Big Gap Filler" to spray expanding foam as filler for the fissures between the wall and the roof.


The window was dismantled due to difficulties reaching certain parts of the wall with paintbrushes.


 As a result, we had to create a makeshift window to keep the BlockHouse sealed and secured during our absence.

Measurements of the window's height and length were taken.

We used chalk string to mark the outline of the plywood we would cut out for the window.


After the body of the window was cut out, we secured it in place with three columns of plywood pressured against it from the inside and outside of the BlockHouse. Each piece was finely cut to -just- fit in the window socket.


Wednesday, July 1, 2015

July 1


  • The back wall of the blockhouse is almost completely painted.
  • We have chosen the color for the walls of the interior and have purchased it.
  • We will finish painting the back wall and commence painting the interior.


When selecting the paint for the interior walls, we were thinking of using green for the bottom half of the walls and blue for the top half. Our idea was to represent the earth and the sky; however, after purchasing the sample and painting a portion of our walls, we decided to forgo the intended color scheme due to its uncanny resemblance to a daycare center.

We wanted a light color that's easy on the eyes. To promote a productive environment, we wanted the area to feel spacious and inviting. Therefore, the team agreed upon a light mint color to be used on all the walls. No layers.