Thursday, November 12, 2015

09/15-11/12/15

09/07/15

  • We bought materials to re epoxy the floor.
09/14/15
  • Moved allot of materials and the work benches back into the blockhouse from various locations.
10/07/15
  • Framed the back wall, moved Vegeta into the blockhouse, and covered certain parts of the block house to prevent damage from contractors.
10/14-11/07

  • Contractors worked on blockhouse for several weeks. They did the drop ceiling, did all the electrical work and installed a new heating/ac unit.
Still waiting for wi-fi.

11/16/15
  • going to put in sink.

Thursday, August 20, 2015

8/10-13


  • Moved everything out of the blockhouse to various locations.
  • Etched the floor with acid and one day later epoxied.
  • Removed the water fountain.
  • Primed and painted the part of the wall behind the fountian .
  • Continued to do touch ups with the facade and outside walls.

Thursday, August 6, 2015

08/03-06


  • Still doing paint touch-ups
  • stem reunion on 08/04
  • started cleaning out the blockhouse on 08/06

Monday, August 3, 2015

7/30


  • Still painting various things, the pipes, the walls, touch ups for the facade.
  • Filled the wall holes where the back wall meets the facade


goals for 8/3


  • touch up the facade.
  • orange trim around the door and repaint the walls.
  • 2nd coat of paint on the inner walls, both blue and water proof paint.
  • look into epoxying the floor and drop ceiling.

Thursday, July 23, 2015

7/22


  • Still continuing to prime the facade.
  • Experimented with the orange paint on the wall and it failed the ascetics test.
  • Tested the orange and purple on the facade and we decided to go with it.
07/23

  • Continue to prime and sand down the facade.
  • Paint the pipes connected to the outside wall to blend in.

Wednesday, July 22, 2015

7/21

  • Continued priming the Facade
  • Attended a robotics workshop
goals for 7/22

  • continue priming

Tuesday, July 21, 2015

07/20


  • Began priming the metal facade.
goals for 07/21

  • Continue priming and sand papering the metal facade.

Monday, July 20, 2015

07/13-16


  • Finished the paint touch ups to the blockhouse
  • Picked up more paint supplies
  • Discovered water seeping through the back wall.
Goals for 07/20

  • Prime the facade

Thursday, July 9, 2015

07/07-09/15


  • Started filling ceiling cracks with big gap and gap filler. After it dried we started shaving the foam that was sticking out to make the top of the walls flush in order to apply hydraulic cement to an even surface.
  • Continued painting all over the inside of the block house
  • Hydraulic cemented some of the holes in the walls and then painted over the dried cement.
  • Took out the metal roll down window and put in a makeshift wooden window replacement.
Goals
continue to the finishing touches of painting.

Thursday, July 2, 2015

July 2


  • The exterior walls have been completely painted.
  • We will finish painting most of the interior today.
Progress on interior:

We taped the base of each wall to avoid paint dripping on the floor.
Bernard wearing his battle armor.


We used "Big Gap Filler" to spray expanding foam as filler for the fissures between the wall and the roof.


The window was dismantled due to difficulties reaching certain parts of the wall with paintbrushes.


 As a result, we had to create a makeshift window to keep the BlockHouse sealed and secured during our absence.

Measurements of the window's height and length were taken.

We used chalk string to mark the outline of the plywood we would cut out for the window.


After the body of the window was cut out, we secured it in place with three columns of plywood pressured against it from the inside and outside of the BlockHouse. Each piece was finely cut to -just- fit in the window socket.


Wednesday, July 1, 2015

July 1


  • The back wall of the blockhouse is almost completely painted.
  • We have chosen the color for the walls of the interior and have purchased it.
  • We will finish painting the back wall and commence painting the interior.


When selecting the paint for the interior walls, we were thinking of using green for the bottom half of the walls and blue for the top half. Our idea was to represent the earth and the sky; however, after purchasing the sample and painting a portion of our walls, we decided to forgo the intended color scheme due to its uncanny resemblance to a daycare center.

We wanted a light color that's easy on the eyes. To promote a productive environment, we wanted the area to feel spacious and inviting. Therefore, the team agreed upon a light mint color to be used on all the walls. No layers.

Tuesday, June 30, 2015

June 30

Buildings & Grounds personnel will be fertilizing the fields near the blockhouse today. Dust may interfere with the painting of exterior walls so we will work on the inside.

Thursday, June 25, 2015

June 25


  • Garage door wall is completely painted.
  • We will apply hydraulic cement on holes in the exterior walls and finish painting the entrance wall.
Priming the back wall.
Garage door area painted.


Wednesday, June 24, 2015

June 24

Goals
  • Finish priming the exterior walls of the blockhouse.
  • Start painting the exterior walls.

Tuesday, June 23, 2015

June 23

Due to the foreseen weather, we will be priming the inside of the blockhouse.

Monday, June 22, 2015

June 22

We'll be priming all day.

The prime we use on the walls are transparent; therefore, when it dries, the appears completely clear. We have to take pictures to keep track of what has already been primed (and proof that we worked at all). We used painter's tape to mark where we left off.


We purchased samples of the colors we are going to use for the blockhouse and tested it on a primed section of the wall.

Bernard advertising Pepsi.

Thursday, June 18, 2015

June 18


Activities
  • Apply Primer on the front exterior wall.
  • We were going to apply primer to the interior walls, but we purchased the wrong roller.
  • We need to fill holes on the front wall with hydraulic cement before priming.
The crew at work.

Tuesday, June 16, 2015

June 17

Hunting Down Materials.

The North Jersey office of Quikrete was contact in reference to their waterproofer for details on their product.


Heavy Duty Masonry Coating: This product can be:

  • Tinted
  • Painted over
  • Thin down to be put on with a roller
    •  It is a concrete base sealer and will seal the walls from water.
  • It has to be special order it either from Lowes or from Progressive Brick (Hasbrought Height. Route 17)
  • The product number is 130140.

Activities
  • Today we will cover the base of the interior walls with hydraulic cement to keep rainwater from flooding into the blockhouse.
  • Transport unwanted objects to SA119.
  • Apply primer to the exterior walls as preparation for painting.
  • Select adequate paint for the blockhouse.

Russell Cardenas applying Hydraulic Cement
on base of interior walls.

June 16


  • We used a grinding tool to remove the rest of the bolts on the walls and floor.
  • Reorganized everything in the blockhouse
  • We used a Power Washer, lent to us by Hugh Knowlton from Buildings & Grounds to remove debris and moss from the exterior walls of the blockhouse. We discovered that water was leaking into the building from the base of the back wall; therefore, we will be applying hydraulic cement throughout the perimeter of its interior.
  • Karcher Power-Washer

    Marie Manzan using the power-washer


June 15


  • The powerpoint presentation was successful. If you are interested in downloading the document, please email stemblockhouse@gmail.com
  • The workbench has been completed.
Goals
  • We will be rearranging and organizing the inside of the blockhouse.
  • Hugh Knowlton from Buildings & Grounds will lend us a Power Washer. We will wash the exterior walls of the blockhouse for painting tomorrow at 10:00am (6/16/15).

Thursday, June 11, 2015

June 11

Accomplishments:
  • Completed the French Drain. (Pictures of progress will be posted soon)

Today at 12:00pm in room S315, we will have a powerpoint presentation about the Blockhouse Project.

Goal:
  • Finish the workbench.

The French Drain

Our first major issue upon entering the blockhouse was not the dust or spiderwebs, but the flood that had formed every time it rained. The rainwater leaked from beneath the garage door and the base of the walls, making it nearly impossible to do productive work within the building. In fact, one of the very first actions taken by our predecessors were to replace the roof because water was leaking from above as shown in the following picture:

Notice the shaded area on the wall, trailing from the roof and narrowing at the floor.
As a follow up, STEM 2015 has been working on a drain in front of the garage door to channel the rainwater through PVC pipes and into a sewer basin.

Chisel and hammer were used to remove the asphalt and old concrete. A shovel was used to dig out the gravel and dirt until we reached about 8'' below ground-level. After this, we created a new base of concrete to support the drainage and seal it in place.


A drill was rented from McManus Rentals by our supervisors Professor Joe Sivo and Luis De Abreu. It was used to create a hole through the sewer basin so we may feed the end of a PVC pipe through it.
Luis drilling through basin sewer.

 Hydraulic Cement was used to seal the base of the outside wall by the garage door and the area around the PVC pipe when fed through the sewer to keep it in place. We mixed the hydraulic cement with water at a 3:1 ratio until we obtained a pasty mixture. It's almost like playing with clay, except it hardens in approximately a minute after mixed with water. Our team had to work fast and diligently, making sure we didn't leave indentation or fingerprints on the finished product.
Luis applying primer to the pipe joints


 In the left, Luis De Abreu slathers primer (the purple liquid) at the joints of the pipes, which prevents any contaminants from interfering with the bonding of the pipes when the Oatey primer cement (the cream container below) is applied to keep them joined.

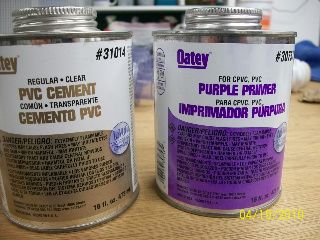
Oatey Cement to the left and Primer to the right. 

 Holes were drilled onto the last pipe leading into the sewer basin and covered by a filter sock (the black fabric) and then buried under gravel. This is calle

d a french drain. The idea is that rain water will sink through the gravel and enter the pipe while keeping out dirt and debris.

Pipe with Filter Sock

Pipe with holes


Filter Sock

At last, the french drain is complete and most of the water flooding into the building has been eliminated; however, more hydraulic cement is to be added at the base of the blockhouse interior walls.


End of pipe leading into sewer basin and sealed with hydraulic cement.
Complete French Drain

Wednesday, June 10, 2015

June 10

Goals

  • We are going to dig out all the mud that accumulated in the trench due to rainwater. Then, we will proceed to drill a hole through the basin sewer with the McManus Drill. We will be digging another 7-8in.
  • Finish the workbench.
  • Organize the blockhouse.
  • Finish preparing powerpoint presentation.

Tuesday, June 9, 2015

June 9


  • There will be a presentation on June 11, 2015 (Thursday).
  • Today the team will focus on preparing the presentation.
  • Supervisors Joe Sivo and Luis De Abreu will rent a drill from McManus Rentals in Hackensack to drill a hole through a concrete sewer basin to connect drainage pipe.
  • The color scheme for the blockhouse has been accepted. Below are illustrations of how the finished product will look: